
How To Make Resin Jewelry | BEST GUIDE 2026

There is nothing more beautiful and satisfying than looking at a gorgeous pendant necklace and knowing that you made it. Or maybe it is that bracelet with those beautiful, delicate dried flower in it.
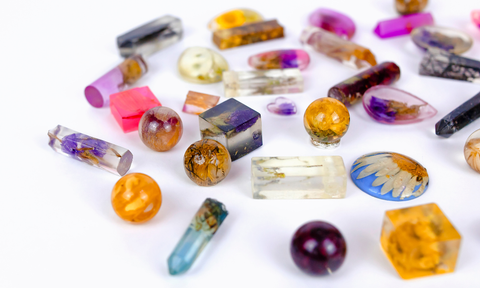
Making handmade resin jewelry is very fun and can be a great hobby or business! There are so many different types of jewelry you can make from resin and what is amazing, is that you can add your own colorants, inclusions and details to make them truly unique.
With epoxy resin, the types of jewelry you can make include:
- pendant necklaces
- bezels (necklaces, bracelets, earrings)
- bracelets
- beads for jewelry
- earrings
- hair pieces
- domed pieces
- many more pieces
You are really limited by your own imagination, there are so many resin jewelry designs you can try. However, it is good to know what you are going to make before making it as you will need to get the proper blanks or molds for your specific jewelry needs.

How To Make Resin Jewelry
Making epoxy resin jewelry can be an easy project to take on with the right supplies and steps. Before beginning to make jewelry from epoxy resin, you need to know what supplies you are going to need.
Resin Jewelry Supplies
To make jewelry out of epoxy resin, you will need:
- Your casting resin of choice (see our article Best Resin For Jewelry here if you are not sure which to buy)
- proper safety gear for resin (respirator and nitrile gloves)
- colorants (mica, alcohol ink, acrylic paint)
- inclusions (dried flowers, glitter)
- a heat gun to get bubbles out
- silicone molds
- any brass or blanks needed (ring blanks, chains for necklaces, bezels)
- resin tools: mixing cups, stir sticks, etc.
- A pressure pot or bubble remover: these are optional but give you professional, bubble free, clear results
Once you have all of your epoxy resin jewelry materials, it is time to start your jewelry. Here is how to make jewelry from epoxy resin.
Resin Jewelry Step 1: Put On Resin Safety Gear
Resin safety is such an important topic that many people don't talk enough about. We highly recommend investing in a proper respirator for resin, and the mask we use and recommend is this full face respirator:
It is also important to wear the right gloves: choose a vinyl or nitrile disposable glove. Latex will not protect your skin from resin.

If you are interested in learning more about why we chose this respirator as the best respirator for resin work, you can read our Resin Safety article.
Resin Jewelry Step 2: Mix Your Resin
Check price of crafting resin here
Depending on the brand of resin you are using for jewelry making, it will likely mix either equal parts 1:1 or a 1:2 mixing ratio by volume (not weight).

If you are wondering, we have a few suggestions of clear resin for jewelry and you can check their prices, all are available on Amazon below:
Best Resin For Jewelry Making
-
ArtResin This is our top choice for beginners, for coasters and for epoxy resin jewelry

-
Alumilite Resin This is a super easy to work with epoxy for jewelry

You can also check out epoxy resin kits on Amazon which will come with colorants and other inclusions if you are interested.
See epoxy resin kits available here
So decide how much mixed resin you will need for your resin jewelry pieces, and pour your resin into a small mixing cup, your hardener into another small mixing cup, and mix them together into a separate mixing cup.
Once you pour your resin and hardener together, you are going to take your stir stick (popsicle stick or silicone stir stick) and slowly mix together. Make sure the mixed epoxy and hardener are thoroughly (and slowly) mixed.
Mixing slowly will also help keep air bubbles out of your mixed epoxy. If you notice bubbles in your mixed resin, this is normal and we will show you how to remove bubbles in step 6 below. Just continue to stir slowly.
Read more about keeping air bubbles out of epoxy resin here.
Read your resin directions carefully to see how long to mix for, but keep in mind that if it not mixed enough, this could create soft spots on your piece.
Mix thoroughly and fully.
Resin Jewelry Step 3: Add Epoxy Colorants
If you are adding colorants, this is the point you are going to want to add them at. You can further divide your mixed resin into more containers if you want different colors.

Whatever colorant you are adding, whether it is a mica powder, a crushed powder makeup, alcohol ink or acrylic ink, you are going to want to add a bit at a time and slowly mix it in. A little goes a long way.
Do not add more than 10% colorant to epoxy, ever.
For my specific resin jewelry, I used 3 different mediums for colorants:
Alcohol ink (which you can see me dropping into the cup in the photo below)

Again, do not ever add more than 10% colorant to resin. Adding too much can alter the consistency or cure of your resin and can lead to problems.
Resin Jewelry Step 4: Add Your Inclusions (Glitter, Dried Flowers)
You can now add your glitter or your dried inclusions such as pressed flowers, leaves, wood, butterfly wings and more into your mold.

If you want your inclusions to sit in a specific place in your resin jewelry, you can sit them into your mold or bezel before pouring the resin, or you can add a very thin resin layer in your mold, add your inclusion and then pour a second layer on top.
What is important to know here, is that your inclusion has to be absolutely, completely dried out no matter when you add them to your resin projects.
If you want to have a piece of paper in the blank or bezel of your resin pendant or other resin jewelry, this is the point where you would seal that paper (and let it dry).
Read: How To Seal Paper For Resin
Resin Jewelry Step 5: Pour Your Resin Into The Molds
Pour your liquid resin into your resin jewelry molds, your bezel or your blank and set it down to dry.
Read more about the best resin jewelry molds or bookmark for later!
It is important to know that the material of choice for your mold is very important. A shiny silicone mold will allow your resin jewelry pieces to pop right out once cured cleanly.
Plastic molds may give you a tougher time getting the resin jewelry out without pieces sticking to the mold.

I will share some of my resin jewelry making phots below.
For this project, you can see me pouring my resin into a silicone jewelry mold, and you can see the variety of silicone resin molds for jewelry on Amazon right here.
Again, a good mold for your resin will be made from silicone and will specify that it is intended for epoxy resin.

Resin Jewelry Step 6: Get The Bubbles Out
Using your heat gun, go over your resin mix and watch as the micro bubbles come to the surface and pop. Move your heating gun in small, round circles, making sure not to stay on one spot for too long.
You will want to do this step immediately after pouring your mixed epoxy, before the resin cure starts to happen.

The heating gun we like to use is the Zap heat gun by American Crafts. You can read more about heat guns for resin in our article, Best Heat Guns for Resin.
Check price of the Zap heat gun here
Resin Jewelry Step 7: Resin Curing
Time for your resin charms to cure. Cover it if you can to make sure there are no dust particles or anything that fall onto it. It will take around 24 - 72 hours to fully cure.
I typically set an upside down Rubbermaid container on my resin pieces so there are no floating pieces of dust that decide to land on my crystal clear surface. When you make your own homemade resin jewelry, you certainly don't want a piece ruined from a little hair or dust particle.
What To Do If A Hair Or Dust Lands On Your Curing Resin Piece
If there is something that lands on your resin pieces before they fully cure, you can always use a very, very fine sand paper to buff those imperfections out, and then go over your piece with a thin layer of resin to make your jewelry crafts shine again.
Resin Jewelry Step 8: Demold And Add Brass/Jewelry Hardware
Once your resin has fully cured, you can demold it carefully and then add any brass necessary, such as chains, jump rings or anything else.
If your resin jewelry did not have a hole in the mold to string your chain through, you can get a small twist drill on Amazon to make your holes in the resin after you demold it so you can add jewelry fixtures like earring hooks or jump rings.

Voila! You have gorgeous resin jewelry! String your chain through or put your jewelry on, and be proud that you made it yourself. How amazing is that!
There are many questions people have about making epoxy jewelry, and we are going to answer some of those below:
What do you need to make jewelry out of resin?
To make jewelry out of resin, you will need the proper resin safety gear, resin, molds, colorants, inclusions, a heating gun and any chains or brass.
Is jewelry expensive to make?
When making resin jewelry, there is an upfront cost of the proper safety gear for resin and the resin itself (either epoxy resin, UV resin or polyester resin), but you can use your safety gear over and over and you can make your resin stretch a long way.
The other costs are minimal such as colorants and a good resin mold. You can get everything in one handy epoxy resin kit.
What kind of resin is used for jewelry?
A lot of jewelry is made with either an epoxy resin, a polyester resin or a UV resin along with a UV light so your resin cures.
Can you put fresh flowers in resin?
You cannot put fresh flowers in the liquid form of resin but you can certainly add dried out flowers in your epoxy. If you are wanting a fresh flower look, you may want to consider how you are drying your flowers.
Flowers that are fresh should not be used as they will continue to decompose in the resin and will not look so fresh over time.
We hope you enjoyed this article.
Here are some other epoxy resin resources for you:
Resin & Wood
BEST Epoxy Resin For A River Table
Resin How To's
Resin Supplies & Purchasing Advice
Best Resin For Your Project
USE RESIN SAFELY
No matter what type of resin you decide to use, always use personal protective equipment (PPE). Take time to carefully go over safety data sheets before making anything with resin, and make sure you have the proper gloves on (not latex) and the right respirator for resin protection.
Here are the exact gloves we always use
This is the respirator we use and recommend for resin work
Read more about resin safety here
And please remember, even if your epoxy resin of choice is "VOC-free, odor free" and/or "non toxic", please always wear the proper respirator for epoxy resin.
Here is the BEST respirator mask for epoxy resin: this Full Face Organic Vapor Respirator checks off all of the boxes for resin safety, and comes with
- free 30 day returns
- a 1 year factory warranty
- free US shipping and free shipping on international orders
Here it is:

Want more resin tips? Follow us on Instagram! 👇

Happy creating!